Follow Me On Social Media!
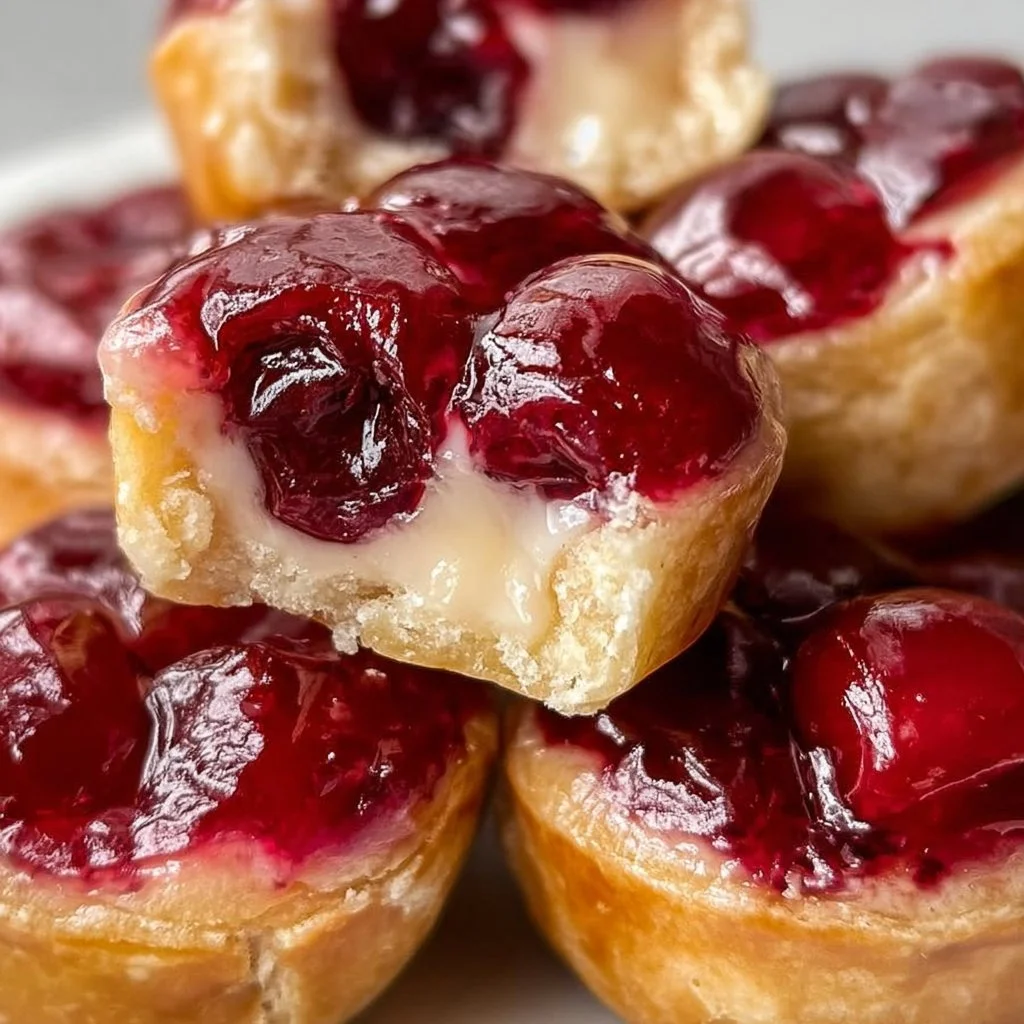
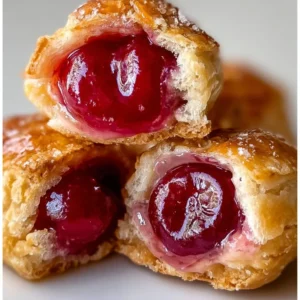
Cherry Pie Bites
GOOD TO KNOW:
The jump to recipe button is there for convenience, but taking a moment to read the full post can make a real difference. You will find useful ingredient notes, extra step-by-step guidance, common troubleshooting answers, and other practical details that can help the recipe come out just right.
If you’re looking for a fun, scrumptious treat that’ll have everyone begging for seconds, let me introduce you to the magic of Cherry Pie Bites!!! YES!!! You heard that right—CHERRY PIE BITES!!! These little delights are bursting with sweet cherry goodness, flaky crust, and the best part is, they are SUPER EASY to make! Imagine dessert that’s bite-sized, shareable, and oh-so-decadent! Trust me, these treats are guaranteed to make your family cheer and your tastebuds dance! I discovered this little gem during a family gathering where cherry pie was always the star of the show, but I thought, why not make it into adorable bites?! And boy, did it take off from there! Easy peasy, deliciously breezy! Let’s dive right into this scrumptious recipe that’s just waiting for YOU to try it!!!
Why You’ll Fall Head Over Heels for These Bites
First of all, they are so SIMPLE to whip up!!! With minimal ingredients and a straightforward process, even a beginner can tackle this recipe with confidence! You will LOVE how much joy these little bites bring to the table!!! They’re perfect for family gatherings, parties, or just a cozy night at home!!! Can you picture it? A tray of warm Cherry Pie Bites surrounded by loved ones, laughter, and lots of happy faces! Also, let’s be real, who doesn’t appreciate a hand-held dessert that’s portable and easy to eat?! These bites have that adorable factor just cranked up to the max!!! Not to mention, they are GREAT for meal prepping—make a batch, pop them into the freezer, and enjoy them whenever that sweet urge strikes! I promise you, each bite is a delightful explosion of flavor that will have your taste buds singing for joy!!! Trust me on this, you definitely won’t regret trying these little treasures!!!
Ingredients You’ll Need
- 1 cup cherry filling (fresh or canned)
- 1 package refrigerated pie crusts
- 1/4 cup sugar
- 1 tablespoon cornstarch
- 1 teaspoon vanilla extract
- 1 egg (for egg wash)
- Optional: powdered sugar for dusting
The ingredient list is as dreamy as it sounds! Feel free to use fresh cherries when they’re in season for that higher flavor impact—definitely a steal in taste!!! If you’re opting for canned cherries, I totally get it; it saves time and still offers yummy results! Also, the sugar and cornstarch combo really helps to create that perfect sweet filling, so make sure not to skip those!!! And how amazing is it that you can find these ingredients at your local grocery store? Keep an eye out for sales for extra savings! Don’t be shy about experimenting with your favorites—like adding a pinch of cinnamon or little lemon zest! GO WILD!!!
Let’s Make These Yummy Bites!
Alright, friends, let’s get this sweet cherry journey started!!! First up, preheat your oven to a cozy 375°F (190°C)—this magical oven will soon be the place where deliciousness happens!!! While it’s warming up, roll out those pie crusts on a lightly floured surface. Using a cookie cutter, cut the dough into small circles—think cute little sunshines!!! Don’t worry if they don’t come out perfectly round; trust me, they’ll taste just as delicious!
Next, grab a bowl and mix together your cherry filling, sugar, cornstarch, and the vanilla extract. Make sure it’s all combined nicely—you want every bite to be full of flavor!!! Now, here comes the fun part! Place a small spoonful of that luscious cherry mixture in the center of each pie crust circle. Fold them in half, and seal those edges with a fork, because we want to keep that yummy filling in, don’t we?!
Beat the egg and brush the tops with that lovely egg wash—it’s going to give you that beautiful golden glow!!! Once that’s done, carefully place your pie bites on a baking sheet lined with parchment paper—you want to keep it all mess-free!!! Bake for about 15-20 minutes until they’re utterly golden brown and heavenly smelling! The aroma will practically dance around your kitchen!!! Let them cool before serving and if you want to add that extra touch, dust them with powdered sugar—optional but oh-so-fun!!!
Tips to Make Your Cherry Pie Bites Extra Special
Here are some fabulous tips! You can make these bites ahead of time—you’ll totally love having them ready for the week!!! Just freeze them before baking, then pop them straight into the oven from the freezer! And when storing leftovers, make sure you place them in an airtight container to keep them fresh. When you’re ready to enjoy them again, just reheat them in the oven for a few minutes. SO GOOD!
Got kids around? Get them involved in the process—let them help cut dough or fill the centers!!! It’s a fun family activity, and trust me, they will LOVE it!!! You can also make mini versions that are easier for little hands. And remember, if you find yourself with extra filling, you can always make a cherry topping for ice cream—seriously, YUM!!!
Ways to Enjoy Your Sweet Bites
These Cherry Pie Bites are amazing on their own!!! But if you want to elevate the experience a bit, try pairing them with a scoop of vanilla ice cream or a dollop of whipped cream! The contrast of warm and cool is just swoon-worthy!!! They’re perfect for picnics, parties, and even just a cozy night in with a movie! I like to present them on a lovely platter, dusted with powdered sugar, and maybe add a few whole cherries for that added pop of color!!! And if you have leftovers (which I doubt), get creative and toss them in a fruit salad or crumble them over yogurt for a delightful breakfast treat!!
Frequently Asked Questions
Place them in an airtight container and keep them in the fridge. They should last for 2-3 days—if they last that long!
Absolutely! Frozen cherries work great! You may want to drain excess liquid to avoid sogginess!
Absolutely! Mini pie bites are a HIT with kids and are oh-so-cute!!! Just use a smaller cookie cutter!
For sure! Apple, blueberry, or even peach would be AMAZING!!!! Get creative!
About 15-20 minutes, or until they’re golden brown—keep an eye on them to avoid burning!
You’re going to absolutely LOVE how easy and delicious these Cherry Pie Bites turn out!!! 🎉 I can’t wait to hear about your kitchen adventures—please share your results with me on social media!!! Let’s keep the joy of cooking alive together!!! Remember: MAKE IT EASY, MAKE IT DELICIOUS, MAKE IT YOURS!!! Happy baking! What will YOU fill your bites with?
Cherry Pie Bites
Scrumptious bite-sized treats filled with sweet cherry goodness and encased in a flaky crust.
Ingredients
Filling
- 1 cup cherry filling (fresh or canned) Fresh cherries can be used when in season for better flavor.
- 1/4 cup sugar Combined with cornstarch for the filling.
- 1 tablespoon cornstarch Helps thicken the filling.
- 1 teaspoon vanilla extract Adds depth of flavor.
Pastry
- 1 package refrigerated pie crusts Convenient for easy assembly.
- 1 each egg (for egg wash) Gives a golden color to the baked bites.
- optional powdered sugar for dusting For an extra touch of sweetness.
Instructions
Preparation
- Preheat oven to 375°F (190°C).
- Roll out pie crusts on a lightly floured surface.
- Use a cookie cutter to cut the dough into small circles.
Filling
- In a bowl, mix together cherry filling, sugar, cornstarch, and vanilla extract.
- Place a small spoonful of the cherry mixture in the center of each pie crust circle.
- Fold them in half and seal the edges with a fork.
Baking
- Beat the egg and brush the tops of the pie bites with the egg wash.
- Place the pie bites on a baking sheet lined with parchment paper.
- Bake for about 15-20 minutes until golden brown.
- Let them cool before serving, and dust with powdered sugar if desired.
Notes
Make ahead by freezing before baking. Store leftovers in an airtight container in the fridge for 2-3 days. Kids can help with preparing and enjoying these bites together.