Follow Me On Social Media!
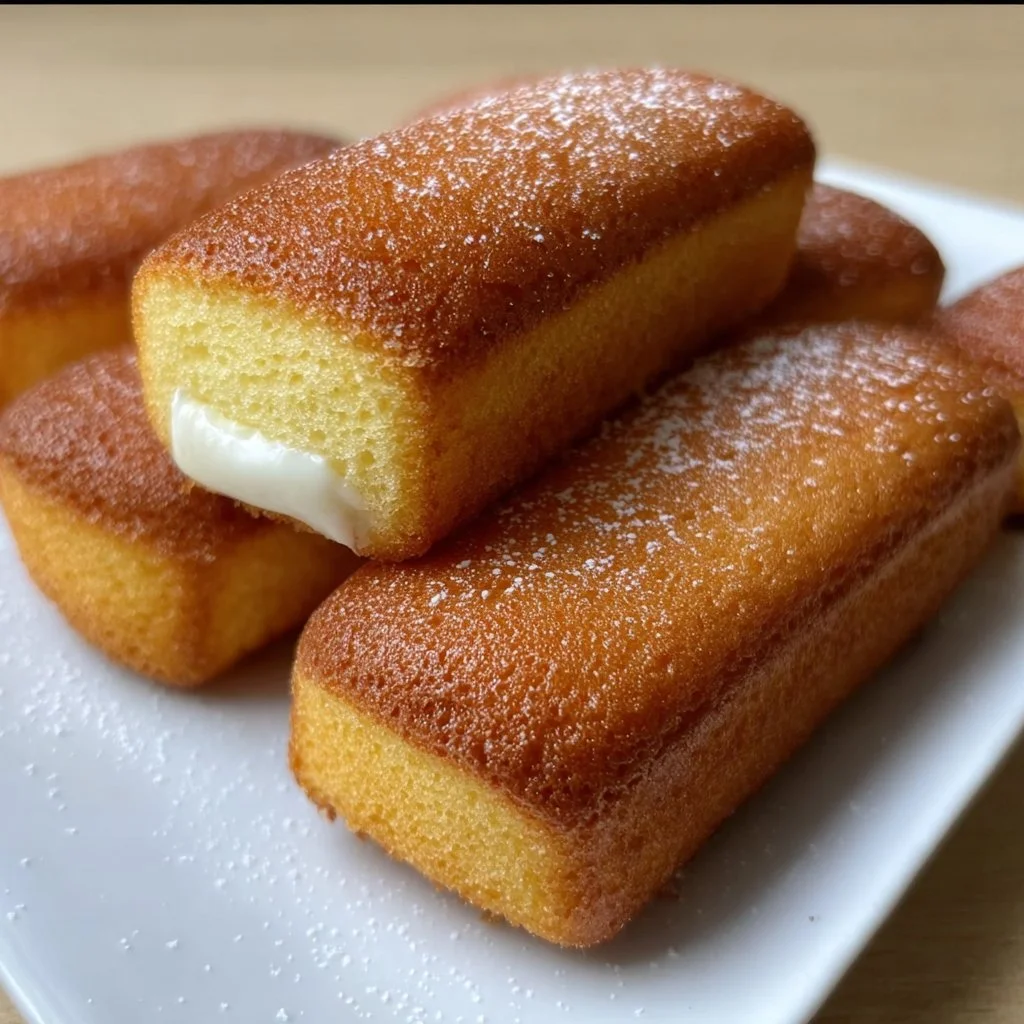
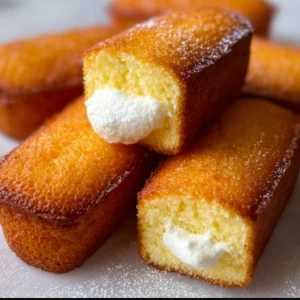
Homemade Twinkies
GOOD TO KNOW:
The jump to recipe button is there for convenience, but taking a moment to read the full post can make a real difference. You will find useful ingredient notes, extra step-by-step guidance, common troubleshooting answers, and other practical details that can help the recipe come out just right.
Oh my goodness, friends! You are in for a treat today! I’m talking about the glorious, wonderfully nostalgic HOMEMADE TWINKIES! Yes, these little cakes of joy are the ultimate comfort food that whisk you back to childhood with every scrumptious bite! Not only are these homemade Twinkies absolutely DELICIOUS, but they also allow you to customize them to your heart’s content—think endless filling options!!! And can you believe they are WAY easier to make than you’d think? I discovered the joy of making these delectable treats one afternoon while craving something sweet that didn’t come from a package. Let’s be honest, we all know homemade tastes SO MUCH better, right?? You can do this!!!
When you take a bite of these homemade Twinkies, you’re going to feel an explosion of flavor and texture that just can’t be matched! They are soooo light and fluffy with that creamy, dreamy filling that will have you singing praises! Each bite melts in your mouth, making them PERFECT for family gatherings or snack time while binging your favorite shows!!! You’ll love that they can be tailored to suit your family’s tastes—chocolate, vanilla, or even fruity fillings are possible! And let me tell you, making these is a fantastic way to bond with your kids in the kitchen (trust me, I used to teach!). You’ll be the hero of your kitchen, the star baker, and the smiling face everyone looks forward to at snack time!! The excitement just bubbles over!!!
Why This Recipe Will Become Your New Favorite!
There’s no doubt that you are going to LOVE these homemade Twinkies!! Why, you ask? First, let’s talk about the incredible flavor! Each bite is like a hug for your taste buds—sweet yet balanced, light yet satisfying! Next, let’s consider the sheer FUN of making them! Gather your family, put on some music, and whip these beauties up together. It’s great family bonding time! Plus, these Twinkies are WAY more affordable when you make them yourself—who needs the store? Not you, my chocolate-loving friends! Feeling adventurous? You can totally swap ingredients to match what you have at home! Maybe you only have coconut milk or almond extract? Go for it!!! There’s no "wrong way" to customize!
The versatility of these treats is simply unmatched! You can make a classic vanilla filling, but why stop there? Chocolate ganache, whipped cream, or even fresh berries can jazz things up—YUM! And honestly, who doesn’t want their homemade Twinkies to have a touch of personal flair? You can also make a make-ahead batch for parties or as tasty meal-prepped snacks. Talk about winning at life! Plus, these homemade Twinkies can be stored easily for those moments when you just NEED a sweet bite! Seriously, what’s not to love?? I can already see your smiles!!
Essential Ingredients to Make Twinkies!
- 1 cup all-purpose flour
- 1 teaspoon baking powder
- 1/2 teaspoon salt
- 1/4 cup unsalted butter, softened
- 3/4 cup granulated sugar
- 2 large eggs
- 1 teaspoon vanilla extract
- 1/2 cup milk
- 1 cup whipped cream for filling
Oh, sweet goodness! These ingredients allow you to create the most incredible, fluffy Twinkies!!! The all-purpose flour gives them that fantastic texture, while the butter adds richness! You can even experiment a bit! If you’re out of butter, coconut oil is a great substitute! And remember, that whipped cream is just waiting to make those Twinkies sing!!! Seriously, you can buy these ingredients at your local grocery store or even order them online—so convenient! Don’t forget, you can switch out the sugar for a healthier option if needed! The options are endless!
How to Make Your Own Twinkies
Let’s dive into the JOY of making these homemade Twinkies!
First, preheat your oven to 350°F (175°C). Yes, get that oven nice and hot! While it’s preheating, grease and flour your Twinkie pan or line it with parchment paper. Don’t worry! It’ll prevent sticking, making your life easier when you want to pop those beauties out!
In a medium bowl, whisk together the flour, baking powder, and salt. It’s all about that fluffy texture, am I right? In another bowl, cream together the softened butter and sugar until it’s light and fluffy—think cloud-like!!! Next, add the eggs one at a time, mixing well after each addition. We want everything to come together in harmony! Stir in that delicious vanilla extract too!
Now, gradually add the dry ingredients to the wet mixture, alternating with milk until combined. This is where the magic happens, and soon you’ll have a luscious batter ready to go! Pour that batter into your TWINKIE pan—fill each cavity about 2/3 full. You can do this!!!
Time to bake! Pop them into the oven for 15-20 minutes, or until a toothpick comes out clean. Just imagine the AMAZING aroma filling your kitchen!!! Let them cool completely, and you’ll be ready to fill them with that divine whipped cream! Once cooled, gently remove them from the pan and fill each Twinkie with whipped cream! Enjoy!!! Seriously, you did it!!!!
Pro Tips for Twinkie Success!
Let me share some fantastic tips for making these homemade Twinkies a breeze! If you want to make them ahead of time, you can easily whip these up a day in advance—just store them in an airtight container. They’ll stay fresh and delicious for a while!
If you’re making a batch, consider doubling the recipe! You’ll want to share with friends and family—trust me, they’ll be asking for more! When it comes to reheating any leftover filled Twinkies, a few seconds in the microwave will make them feel fresh again—hello, FLUFFY!!!
Feel free to get the kiddos involved! They can help with the filling, or even decorating the tops with sprinkles—so much fun!!! Overall, this is a marvelous recipe that allows for creativity and sharing love through baking!
Serving Suggestions for Your Twinkies!
Now that you have these incredible homemade Twinkies, let’s talk about how to enjoy them to the fullest! Pair them with a refreshing glass of milk or hot chocolate for an unbeatable combination that’ll warm your heart! If you’re feeling fancy (who doesn’t love a bit of flair?), serve them with fruit, maybe some strawberries or raspberries—they not only look gorgeous but are oh-so-delicious!!!
Don’t forget about the kids’ birthday parties—they will absolutely LOVE these! You could even slice them up to make mini Twinkies for a snack platter, or drizzle some chocolate sauce over them for that WOW factor!!! Endless leftover creativity awaits you! Are you feeling the excitement yet???
Common Questions About Homemade Twinkies!
Yes, you can! Cake flour will give them a lighter texture, but keep an eye on the baking time!
Store them in an airtight container at room temperature for up to 3 days, or refrigerate for longer freshness!
Using a piping bag with a round tip makes it easy to fill them quickly and efficiently!
Absolutely! Get creative! Try using Nutella, peanut butter, or flavored whipped cream—so many yummy possibilities!
While a Twinkie pan is ideal, you can use a muffin tin and create a different shape! Either way, they will taste just as good!
WOW, friends! Making your own homemade Twinkies is not just easy; it’s a FUN experience packed with delicious memories! I can’t wait for you to try this recipe! If you have any questions or feedback, PLEASE let me know! And be sure to share your beautiful creations on social media—tag me so I can cheer you on!!! Happy baking, everyone!!!
Homemade Twinkies
Delicious and customizable homemade Twinkies that bring back childhood nostalgia and are easy to make.
Ingredients
For the Twinkie Cake
- 1 cup all-purpose flour Gives the Twinkies a fantastic texture.
- 1 teaspoon baking powder Helps the Twinkies rise.
- 1/2 teaspoon salt
- 1/4 cup unsalted butter, softened Can be substituted with coconut oil.
- 3/4 cup granulated sugar Can be swapped for a healthier option.
- 2 large eggs
- 1 teaspoon vanilla extract
- 1/2 cup milk
For the Filling
- 1 cup whipped cream The key ingredient for filling.
Instructions
Preparation
- Preheat your oven to 350°F (175°C).
- Grease and flour your Twinkie pan or line it with parchment paper.
- In a medium bowl, whisk together the flour, baking powder, and salt.
- In another bowl, cream together the softened butter and sugar until light and fluffy.
- Add the eggs one at a time, mixing well after each addition.
- Stir in the vanilla extract.
- Gradually add the dry ingredients to the wet mixture, alternating with milk until combined.
- Pour the batter into your Twinkie pan, filling each cavity about 2/3 full.
Baking
- Bake in the preheated oven for 15-20 minutes, or until a toothpick comes out clean.
- Let them cool completely before filling with whipped cream.
Filling
- Gently remove the Twinkies from the pan and fill each with whipped cream.
- Serve and enjoy your homemade Twinkies!
Notes
These Twinkies can be made ahead of time and stored in an airtight container. They can easily be customized with various fillings like chocolate ganache or flavored whipped cream.