
Follow Me On Social Media!
Heavenly Kentucky Butter Cake Cookies Recipe

GOOD TO KNOW:
The jump to recipe button is there for convenience, but taking a moment to read the full post can make a real difference. You will find useful ingredient notes, extra step-by-step guidance, common troubleshooting answers, and other practical details that can help the recipe come out just right.
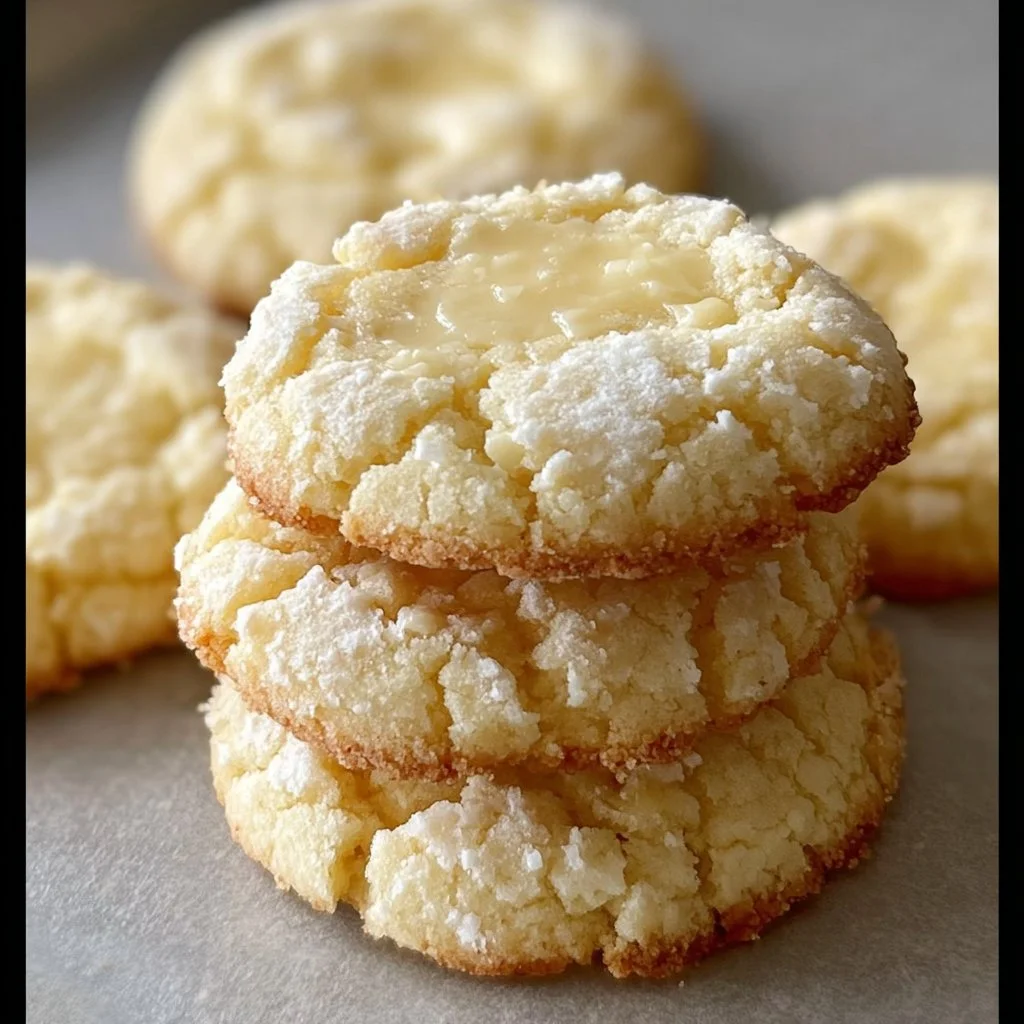
If you’re craving something cozy, sweet, and totally bakery-worthy, these Heavenly Kentucky Butter Cake Cookies are about to be your new obsession. These Kentucky Butter Cake Cookies taste like the best buttery pound cake you’ve ever had, shrunk down into soft, tender, glaze-soaked cookies. They’re buttery, they’re melt-in-your-mouth, they’re SIMPLE. And yes, they really do taste like little bites of cake!!!
I stumbled on the idea years ago when I was playing with my favorite Kentucky butter cake recipe and thought, “What if this could be a cookie?” (It was a late-night, kids-finally-in-bed moment.) One test batch later, my family in Austin went QUIET. Just chewing. Just happy. That’s when you know it’s a keeper.
These Heavenly Kentucky Butter Cake Cookies are perfect for potlucks, holidays, freezer stashes, and honestly—Tuesday nights when you just need something warm and sweet. You get soft sugar-cookie vibes with that classic butter cake flavor and a crackly sugary glaze on top that soaks in and makes everything extra moist and magical.
They use basic pantry ingredients, come together in under an hour, and you don’t need any fancy tools. Just a bowl, a mixer, and your beautiful cookie-loving self. You can absolutely do this. You really, really can.
Why These Cookies Are Pure Butter Bliss
You’re going to fall for these Heavenly Kentucky Butter Cake Cookies for so many reasons, and they just keep getting better every time you make them. First, the texture is unreal: soft and tender in the center with that light, sugary, almost caramel-y glaze on top. They stay moist for days, which feels like a small miracle in cookie-land.
They’re also wildly flexible, which my meal-prep folks and busy parents will LOVE. Doing dessert for a crowd? Double the batch. Baking ahead for the week? These freeze like a dream. Want to bring something special but not fussy to a church potluck or classroom party? These look fancy, taste fancy, but they are absolutely not high-maintenance.
If you’re watching sugar or butter a bit, the recipe is still workable with a few tweaks (we’ll talk about that later), and since they’re cookies—not a huge slice of cake—you can enjoy one or two without feeling overboard. They’re such a lovely “little treat” dessert.
Kids adore them because they’re sweet and simple. Grown-ups adore them because they taste nostalgic, like a buttery vanilla cake from childhood. And as a Pinterest-collector recipe, this one’s such a winner: it looks pretty on a platter, the ingredients are straightforward, and the results are so dependable, like, again and again dependable. These Kentucky Butter Cake Cookies are comforting, impressive, and EASY all at once, which is my favorite combination ever.
What You Need For Kentucky Butter Cake Cookies
Here’s everything you’ll need to make both the cookies and that dreamy glaze:
- 2 ½ cups (310 grams) all-purpose flour
- 2 large eggs
- 1 cup (225 grams / 8 oz) unsalted butter, softened
- 1 cup (200 grams) granulated sugar
- ½ cup (100 grams) powdered sugar
- 1 tsp vanilla extract
- 1 tsp butter extract (optional, for extra buttery flavor)
- 1 tsp baking powder
- ¼ tsp salt
For the buttery glaze:
- ½ cup (115 grams / 4 oz) unsalted butter
- ¾ cup (150 grams) granulated sugar
- ¼ cup (60 mL / 2 fl oz) water
- 1 tsp vanilla extract
That optional butter extract is the secret “wow” ingredient. It’s what makes people say, “What is that flavor?!” in the best possible way. If you don’t have it, totally fine—just use vanilla. I can usually find butter extract at larger grocery stores here in Austin or order it online when I’m planning holiday baking.
If you’re trying to lighten things a touch, you can swap up to ¼ cup of the granulated sugar in the cookie dough with a zero-calorie baking sweetener, and it still turns out pretty great. You can also use a fine whole wheat pastry flour for up to 1 cup of the all-purpose if you want a tiny fiber bump (the texture changes slightly but in a cozy way).
Butter-wise, stick with real unsalted butter for the best classic flavor. Store brands are usually just fine; no need to splurge. These are budget-friendly cookies, which I love for big family batches.
And seriously—play with extracts. A tiny splash of almond or even lemon with the vanilla can give a fun twist while keeping the heart of the recipe the same.
How To Make These Heavenly Cookies (Step-by-Step Overview)
Start by getting your oven and pans ready. Preheat your oven to 350°F (175°C) and line your baking sheets with parchment paper. This is your cookie safety net—no sticking, easy cleanup. If your oven runs hot, you might even place the rack slightly above center. Don’t worry, you’ll figure out your oven’s sweet spot after a batch or two.
Now, the “Sugar Fusion” moment. In a large bowl, cream the softened butter with the granulated sugar and powdered sugar. Go for medium-high speed for 2–3 minutes until the mixture is light and fluffy and a bit pale in color. This step builds air into the dough, which gives you that soft, tender crumb. If it still looks grainy, just keep mixing. You’re not messing it up, you’re just helping it along.
Next up, the “Wet Ingredient Integration.” Beat in the eggs one at a time, then add the vanilla extract and butter extract (if using). Mix until everything looks completely smooth and unified—no streaks of egg. If your mixture looks slightly curdled, it’s okay; the flour will bring it back together, I promise.
Time for the dry ingredients. In a separate bowl, whisk together the flour, baking powder, and salt. Then “Dry Ingredient Fusion”: gently fold this mixture into the wet ingredients. Mix on low or with a spatula until just combined. When you see the last streak of flour disappear, stop. Overmixing = tougher cookies. We want soft, so we stop early.
For “Cookie Shaping,” scoop or roll the dough into 1.5-inch balls and place them on your prepared baking sheets, leaving space between each. These don’t spread a ton, but they need a little room. Gently flatten each ball into a thick disk using your palm or the back of a spoon. If the dough feels sticky, chill it in the fridge for 15–20 minutes and try again. No biggie.
The “Baking Process” is quick: bake for 10–12 minutes. You’re looking for set edges and tops that look just barely done—maybe even a touch underdone in the center. They will continue to firm up as they cool, so resist the urge to bake until golden-brown all over.
For “Initial Cooling,” let the cookies rest on the baking sheet for about 5 minutes. They’re very soft at this point, so moving them too fast can cause breakage (and sadness). After 5 minutes, transfer them carefully to a wire rack.
While they’re still warm, make your glaze. In a small saucepan, melt the butter over medium heat. Add the granulated sugar and water, stirring continuously until the sugar fully dissolves. It shouldn’t feel gritty. Remove from heat and stir in the vanilla extract. That’s your “Glaze Creation” done—easy, right?
Now the fun “Glazing Technique.” While the cookies are warm (not hot enough to burn your fingers, just warm), brush or drizzle the glaze generously over each one. It will soak in and give them that signature Kentucky butter cake vibe. Want extra flavor and moisture? Go back and do a second light layer. You honestly can’t mess it up.
Finally, let the cookies cool completely—this “Final Cooling” lets the glaze set and form that delicate sugary exterior. The waiting is the hardest part, but it’s SO worth it.
Smart Tips To Make These Even Easier
Chill your dough if it feels too soft or sticky. Even 20 minutes in the fridge makes it easier to roll and shape, especially if your kitchen (like mine in Texas) runs a little warm. For make-ahead magic, you can roll the dough into balls, freeze them on a tray, then bag them once solid. Bake from frozen, adding 1–2 extra minutes.
For storage, keep your fully cooled cookies in an airtight container at room temperature for 3–4 days. They actually taste even better on day two as the glaze settles in. For longer storage, freeze them (glaze and all) in layers with parchment between them for up to 2 months.
To “reheat” that fresh-baked vibe, pop a cookie in the microwave for about 8–10 seconds. It softens the center and wakes the butter right back up. If you’re batch cooking for a party, bake and glaze the day before, then just arrange them on a pretty platter right before serving.
For kids, you can make them smaller: roll 1-inch balls instead and reduce the bake time slightly. Smaller cookies are great for little hands and school events. And talk through the steps with them! This is such a good “first baking project” because the recipe is forgiving and they get to paint the glaze on, which feels like art class plus dessert.
How To Serve These Heavenly Butter Cookies
These Heavenly Kentucky Butter Cake Cookies are so versatile. Serve them slightly warm with a glass of cold milk for a simple weeknight dessert, or pair them with coffee or hot tea for a sweet afternoon pick-me-up. I love them on a dessert board with berries and a bowl of whipped cream or Greek yogurt for dipping—fancy without being fussy.
For holidays, stack them on a cake stand, let that shiny glaze catch the light, and sprinkle just a tiny bit of powdered sugar over the top for a snow-dusted effect. They’re stunning at baby showers, brunches, or as part of a cookie swap.
Leftovers (if you have them!) can be crumbled over vanilla yogurt, tucked into lunch boxes, or layered into a quick parfait with fruit and whipped cream. Don’t overthink it—these cookies are friendly. They just want to be eaten and enjoyed, again and again.
Kentucky Butter Cake Cookies FAQ
Yes! You can refrigerate the dough, covered, for up to 48 hours. Let it sit at room temp for 15–20 minutes if it’s very firm, then scoop, shape, and bake as directed.
Nope, you don’t. Vanilla alone works beautifully. Butter extract just boosts that classic “butter cake” flavor, so if you have it, use it, but don’t let it stop you if you don’t.
Most of the time, that means your butter was too soft or your dough was too warm. Try chilling the dough for 20–30 minutes before baking, and make sure you’re measuring the flour fairly accurately. Parchment-lined pans also help the cookies hold their shape better.
Yes, you can cut the glaze sugar back by a couple tablespoons without hurting the recipe. Just know that the glaze is what gives these cookies that classic Kentucky butter cake sweetness, so I don’t recommend reducing it too much.
Absolutely. They freeze wonderfully and thaw quickly at room temp. For gifting, I like to let the glaze dry completely, then pack them in single layers (or with parchment between layers) in a pretty tin or box so they arrive looking as heavenly as they taste.
These Heavenly Kentucky Butter Cake Cookies are the kind of recipe that makes you feel like a baking rockstar with almost zero stress. They’re easy, they’re buttery, they’re so, so delicious, and they work for basically every occasion you can think of.
If you try them, come back and tell me how they turned out—leave a note, ask your questions, or tag me on social when you share your cookie photos so I can cheer you on. You can absolutely make these your new signature cookie… and honestly, why not start tonight?
Kentucky Butter Cake Cookies
Cozy, buttery cookies resembling a delicious pound cake, with a sugary glaze that adds moisture and flavor.
Ingredients
For the cookies
- 2.5 cups all-purpose flour
- 2 large eggs
- 1 cup unsalted butter, softened
- 1 cup granulated sugar
- 0.5 cup powdered sugar
- 1 tsp vanilla extract
- 1 tsp butter extract (optional) For extra buttery flavor
- 1 tsp baking powder
- 0.25 tsp salt
For the buttery glaze
- 0.5 cups unsalted butter
- 0.75 cups granulated sugar
- 0.25 cups water
- 1 tsp vanilla extract
Instructions
Preparation
- Preheat your oven to 350°F (175°C) and line your baking sheets with parchment paper.
- In a large bowl, cream the softened butter with the granulated sugar and powdered sugar on medium-high speed for 2–3 minutes until light and fluffy.
- Beat in the eggs one at a time, then add the vanilla extract and butter extract, mixing until smooth.
- In a separate bowl, whisk together the flour, baking powder, and salt.
- Gently fold the dry ingredients into the wet ingredients until just combined.
Baking
- Scoop or roll the dough into 1.5-inch balls and place them on the baking sheets, leaving space in between.
- Flatten each ball into a thick disk using your palm or spoon.
- Bake for 10–12 minutes until edges are set and tops look just barely done.
- Let the cookies rest on the baking sheet for 5 minutes before transferring to a wire rack.
Glazing
- While the cookies are cooling, melt the butter in a small saucepan, add the granulated sugar and water, stirring until dissolved.
- Remove from heat and stir in the vanilla extract.
- Brush or drizzle the glaze generously over each warm cookie, allowing it to soak in.
Final Cooling
- Allow the cookies to cool completely to let the glaze set.
Notes
For an added twist, use a splash of almond or lemon extract. These cookies freeze well and can be made ahead of time.